
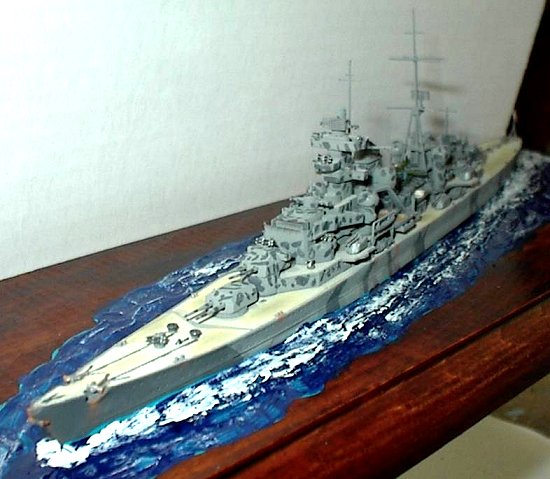
TAMIYA 1/700 PRINZ EUGEN
By Len Roberto
The Kit.
In short, Tamiya’s new 1/700 scale waterline Prinz Eugen is a beauty. You get four sprues: one
with the hull, deck and flat waterline bottom, one with
the superstructure assembly, and two armaments and
ancillary equipment sprues. The kit also provides
instructions and parts to build the cruiser as she
appeared with the Bismarck or during the Channel
Dash-- Operation Cerberus in February 1942 with a
different camo scheme.
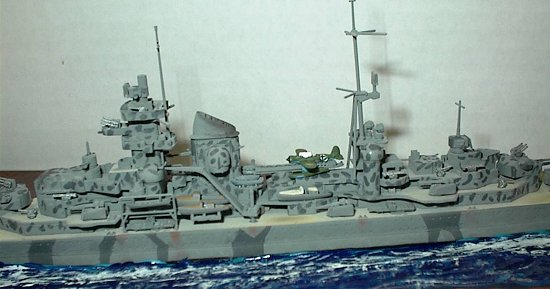
Molding is crisp and the level of detail attained in
this scale is amazing. The tiny antiaircraft armament, searchlights, torpedo
tubes, and ship’s boats possess a level of intricacy
that you have to see to believe. It is so good that I
decided to not use any photo etching except for the three box-like radars, which I had replacements for, and a nice aircraft
catapult to replace the chunky kit part.
The Construction.
I started by gluing the two hull halves to the flat waterline bottom. The kit-supplied weight was superglued to the hull
bottom for heft and then the one-piece deck was glued onto the hull. Fit here was superb. A few elastic bands made sure the
deck fit snugly and no putty was needed at all.
I then proceeded to assemble the rest of the kit in sub-assemblies, which included: 4 main armament turrets, high
angle anti-aircraft weapons, bridge, stack, and the aft superstructure with mast.
Everything fit together crisply with no trouble. Some of the parts are quite tiny and a good tweezers is mandatory.
Once these sub-assemblies were completed, I proceeded to paint and mask.
Painting.
I chose to model the ship as it appeared in February 1942 during the famed Channel Dash. I chose this scheme
because it looked quite attractive and the black and white stripe pattern is seen everywhere! After reading some online
discussions about the ship’s paintwork, it appears there is some controversy and no definitive proof on Prinz Eugen’s camo
from any period. There is a lack of photographic evidence and what you read is sometimes confusing.
Anyway, the first task was to spray the deck with Tamiya Deck Tan
XF-55. I would enhance this later on with chalk pastels. When dry, I
spent a good hour masking the entire deck with tiny pieces of Scotch
tape and a sharp #11 blade. The wood decks were also present on upper
levels so it was a tedious experience to get these little pieces of tape to
stay down and fit around a curve! Without a doubt, this is the part that I
hate the most but I am learning that doing this part right makes a huge
difference in the cleanliness and neatness of your model.
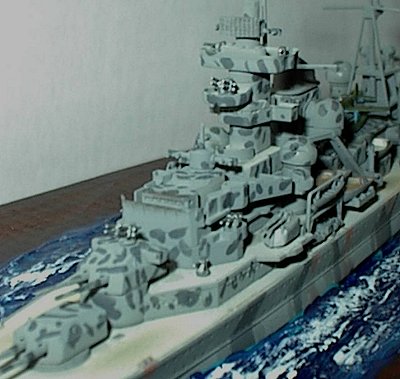
When satisfied that all was ready, the next color was sprayed. This
color was Tamiya Dark Sea Grey XF-54. This was sprayed on the entire
hull and all superstructure assemblies. After letting this dry for a while, I
again spent an hour masking the hull. The pattern calls for Dark Grey
XF-24 in a pattern that slashes down the hull towards the water and the
bow and stern portions were also Dark Grey. I used Scotch tape and cut
out the patterns with a blade. I airbrushed the Dark Grey on the hull and
a few minutes later pulled off the masks.
I decided to glue the sub-assemblies onto the deck before painting
the blotches of grey to aid me with placement. The directions called for
Field Grey XF-65 but I used a mixture of Neutral Grey and Light Grey. I
thinned it down and picked my finest brush to delicately apply the
blotches. It mostly consists of tiny slashes on all vertical surfaces and on the tops of the turrets, bridge and direction
finders. I laid the instruction pattern behind the model and worked on one portion at a time like turret one and then moved
onto to another section. I should have made the blotches even thinner—it’s easy to lose your focus when going back and
forth from model to instructions, etc. Anyway, I am happy with the result.
Construction continues.
Once the camo was completed, it was ready for launch. Instead of using modeling paste, I decided to use only the
thick Liquitex paint for simulated water. I mixed a batch of blue and green that was then plopped onto my base. I spread the
paint around and used a piece of folded paper to craft a light sea.
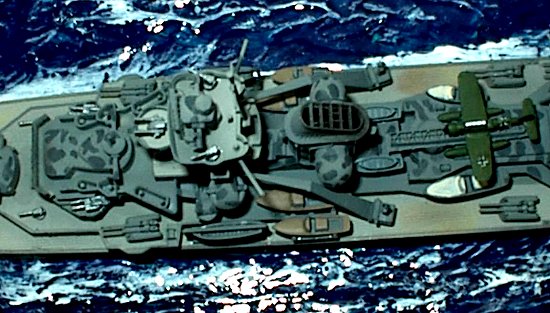
After this had dried, it was on to a light
weathering session. I use chalk pastel dust smudged
on with a stiff old brush. I use a reddish brown
concoction lightly dusted onto anchors, boat davits,
and on random areas around the hull. I use black to
accent around the funnel top. Finally, the deck tan
color is enhanced by using a light brushing of beige,
yellow and tan chalk dust.
I attached a Kriegsmarine flag on the stern with
CA glue. I could not for the life of me on the directions
find where to attach the decal of the ship’s crest – I
will have to hunt for a picture or notation of where this
should be placed. The floatplane was glued together
and painted deep green topside and a light blue
underside. German cross decals were applied. I shot
a flat coat onto the ship, brushed two coats of Future
onto the water base and there you have it.
Conclusions.
This kit was an absolute joy to build. Everything fits and the level of detail kept me interested throughout. When a kit is
this well done, it forces me to give it my utmost in terms of patience and care. This kit would make a terrific first project for
anyone wanting to give small scale ship modeling a try or if you just want to take a diversion from your normal fare. I can’t
praise this kit enough!
|
