
THE BATTLE OF THE DENMARK STRAIT
By José M. Rico
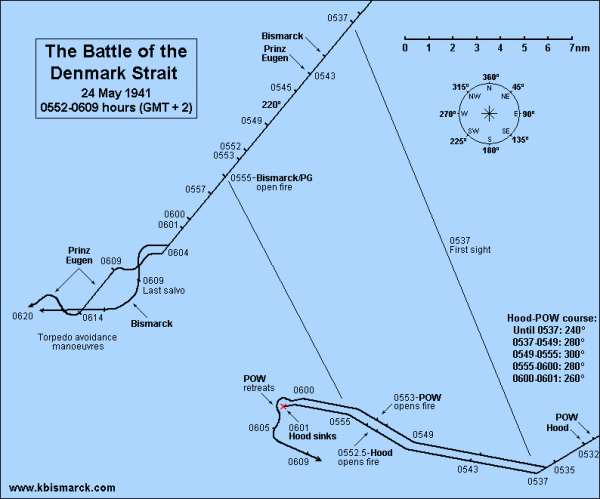
The Battle of the Denmark Strait was a brief naval engagement that lasted a little more than a quarter of an hour. It was a true clash of titans in which the largest warships in the world were put to the test, and it will be remembered as a battle that ended in the sinking of one of the most famous ships ever.In the early morning of 24 May, as the first lights of dawn were about to appear in the sky, the weather improved and the visibility increased. The German battle group maintained a course of 220ş and a speed of 28 knots, when at approximately 0530, Prinz Eugen's hydrophones picked up propeller noises of two ships on her port side. At this time the German radars still returned no echo. Minutes passed, when at 0537 the Germans sighted what they first thought to be a light cruiser at about 19 miles (35,190 metres / 38,480 yards) on port side. At 0543, another unidentified unit was sighted to port, and thereafter the alarm was given aboard the Bismarck and Prinz Eugen. Aboard the Bismarck the identification of the enemy ships was uncertain, and they were now both mistakenly thought to be heavy cruisers. Correct identification at this time was of great importance in order to choose the right type of shells. Prinz Eugen's First Artillery Officer (I.A.O.), Korvettenkapitän Paulus Jasper, also believed the approaching ships to be cruisers and ordered to load 20.3-cm high explosive shells (Spgr. L/4,7).1 At this point, the British warships (in reality the battlecruiser Hood and the battleship Prince of Wales) were approaching the German battle group on a course of 280ş at 28 knots. Vice-Admiral Holland, aboard the Hood, familiar with the vulnerability of his battlecruiser in long range combat, was probably trying to get closer quickly before opening fire. Admiral Lütjens did not have any other choice but to accept the combat.
The Combatants.
| Ship: | Bismarck | Prinz Eugen | Hood | Prince of Wales |
| Displacement: | 51,700 mt | 19,042 mt | 49,136 mt | 44,400 mt |
| Armament: Main: Secondary: Torpedoes: |
8 x 38 cm 12 x 15 cm - |
8 x 20.3 cm - 12 x 53.3 cm |
8 x 38.1 cm - 4 x 53.3 cm |
10 x 35.6 cm 16 x 13.3 cm - |
| Armour: Main belt: Turrets: Upper deck: Armour deck: |
320 mm 130-360 mm 50-80 mm 80-120 mm |
80 mm 160 mm 25 mm 30 mm |
305 mm 127-381 mm 38 mm 75 mm |
348-374 mm 150-324 mm - 124-150 mm |
| Speed: | 30 knots | 32.5 knots | 29-30 knots | 28-29 knots |
Due to the similar silhouettes of the German ships, at 0549 Holland ordered both of his ships to engage the leading German ship (the Prinz Eugen) believing she was the Bismarck. After this, the British ships made a 20ş turn to starboard on a new course of 300ş. At 0552, just before opening fire, Holland correctly identified the Bismarck at last, and ordered his force to shift target to the right-hand ship, but for some reason Hood kept tracking the leading ship. Aboard the Prince of Wales, however, the Gunnery Officer Lieutenant-Commander Colin McMullen, correctly targeted the Bismarck which followed in Prinz Eugen's wake a mile or so behind. Suddenly, at 0552˝, and from a distance of about 12.5 miles (23,150 metres / 25,330 yards), the Hood opened fire, followed by the Prince of Wales half a minute later at 0553. Both ships opened fire with their forward turrets (4 x 15-inch + 6 x 14-inch), since their after turrets could not be brought to bear due to the ships' unfavourable angle of approach. The Germans finally realized they were facing enemy capital ships, and Admiral Lütjens immediately signalled to Group North: "Am in a fight with two heavy units". The first salvo from Prince of Wales landed over and astern of Bismarck. Afterwards, Prince of Wales started suffering the first of many mechanical problems, as "A" turret's no. 1 gun broke down temporarily and could not fire anymore. Her second, third and fourth salvoes fell over Bismarck. Hood's first two salvoes fell short from Prinz Eugen throwing some splinters and much water on board.
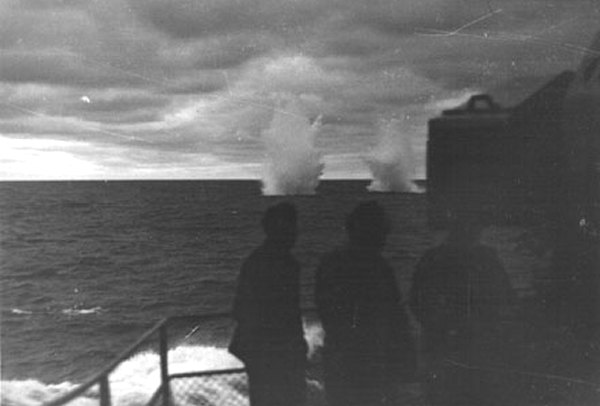
Two 15-inch shells from the Hood land close to the Prinz Eugen during the initial phase of the battle of the Denmark Strait. This photo was taken by war reporter Josef Lagemann from the after 10.5-cm Flak position on the starboard side.
Jot Dora! The Bismarck Opens Fire.
The British shells were already landing close, but the German guns still remained silent. Aboard the Bismarck, the First Artillery Officer (I.A.O.), Korvettenkapitän Adalbert Schneider, in the foretop command post, requested several times permission to open fire without reply from the bridge. Finally at 0555, while Holland's force was turning 20ş to port (a manoeuvre that now permitted Bismarck to identify correctly the Hood and a battleship of the King George V Class), the Bismarck opened fire, followed by the Prinz Eugen immediately afterwards.2 The distance at this time was around 11 miles (20,300 metres / 22,200 yards). Both German ships concentrated their fire on the foremost right opponent, the Hood. Bismarck's first salvo landed short. Aboard the Prinz Eugen, the port 53.3-cm torpedo tubes had already been trained towards the enemy and Captain Brinkmann ordered the Torpedo Officer, Kapitänleutnant Sigurd Reimann: "permission to fire as soon as in reaching range." At 0556, Prince of Wales' fifth salvo fell over again, but the sixth straddled and likely hit the Bismarck even though aboard the British battleship no hits were observed. The initial fire of the Germans had been excellent, and at 0557, the Prinz Eugen had already obtained a hit on Hood's shelter deck near the mainmast. This caused a big fire which spread as far as the second funnel. The Bismarck had also been hit, and was now leaving a broad track of oil upon the surface of the sea. Therefore, Lütjens ordered the Prinz Eugen (that had already fired six salvoes on Hood) to change target towards the Prince of Wales, together with the secondary battery of the Bismarck which had just entered in action. From the start the Bismarck found herself favoured by the enemy disposition that allowed her to use all eight guns while the Prince of Wales was now firing at Bismarck with only five, and the Hood was erroneously firing at Prinz Eugen.
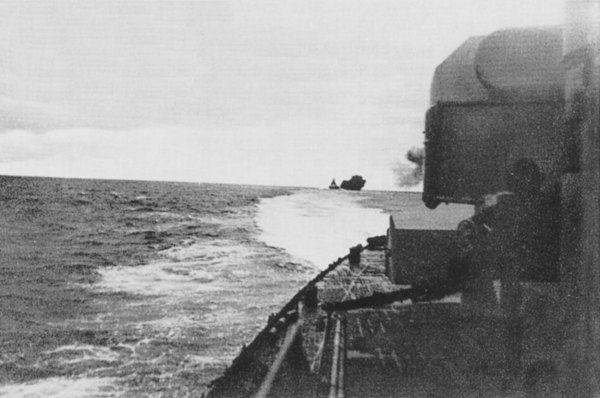
The Bismarck opens fire against the Hood as seen from the Prinz Eugen. This is one of the first salvoes fired by the German battleship at about 0555-0556 hours. The Bismarck is about 2,500 metres behind the Prinz Eugen. Photo: PK-Lagemann.
The Destruction of the Hood.
At 0600, the Hood and the Prince of Wales were in the process of turning another 20ş to port in order to bring their after turrets into action, when Bismarck's fifth salvo hit the Hood. The distance was less than 9 miles (16,668 metres / 18,236 yards). At least one 38-cm shell penetrated Hood's armour belt and reached an after magazine where it exploded.3 The German observers were awestruck by the enormous explosion. Sunderland Z/201 (Flight-Lieutenant R. J. Vaughn) that had just arrived in the neighbourhood from Iceland saw the Hood blowing up from the air before coming under heavy A.A. fire from the German ships and forced to take immediate cloud cover. Bismarck's Fourth Artillery Officer (IV.A.O.), Kapitänleutnant Burkard von Müllenheim-Rechberg, described what he saw:
"At first the Hood was nowhere to be seen, in her place was a colossal pillar of black smoke reaching into the sky. Gradually at the foot of the pillar, I made out the bow of the battlecruiser projecting upwards at an angle, a sure sign that she had broken in two."The Hood, the Mighty Hood, pride of the Royal Navy and during 20 years the largest warship in the world, split in two and sank in three minutes at about 63ş 22' North, 32ş 17' West. The stern portion sank first, end up and centre down, followed by the bow portion, stem up centre down. It all happened so fast that there was not even time to abandon the ship. Out of a crew of 1,418 men, only three survived. Vice-Admiral Holland and his fleet staff, the commander of the Hood Captain Ralph Kerr, and everyone else perished. The three survivors were rescued after three and a half hours at sea by the destroyer Electra (Commander Cecil Wakeford May), and later landed in Reykjavik.4
0601 hours German Summer Time. 0501 hours Central European Time (set on board the German ships).
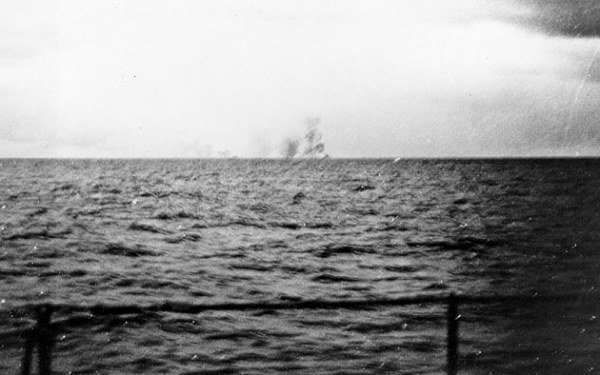
The Hood blows up as seen from the Prinz Eugen. It took the Bismarck 40 x 38-cm shells to sink the Hood.
After the Hood blew up, the Bismarck concentrated her fire on the Prince of Wales. The British battleship had since altered her course to avoid the wreck of the Hood, and this placed her between the sinking battle cruiser and the German ships. The Germans were thus presented with an easy target switch. At 0602, the Bismarck hit Prince of Wales' bridge, killing everybody there, except the commander, Captain John Catterall Leach and another man. The distance had decreased to 14,000 metres (15,310 yards), and now even the 10.5 cm heavy anti-aircraft battery on Prinz Eugen (on Bismarck probably too) entered in action. The Prince of Wales was at a clear disadvantage, and at 0603 launched a smoke screen and retreated from the combat after being hit a total of four times by the Bismarck and three more by the Prinz Eugen.5 At this time the German ships began executing a series of avoidance manoeuvres after torpedoes had been erroneously detected by hydrophones and bubble trails spotted from the bridge of Prinz Eugen. These sudden course alterations undoubtedly affected the shooting of the Germans that didn't get anymore hits on the enemy. The British battleship, in turn, fired three more salvoes with "Y" turret under local control while retreating, but did not obtain any hits either. At 0609 the Germans fired their last salvo and the battle ended. For the British, this must have been incredible, the German ships kept the same course instead of following the damaged Prince of Wales and finishing her off.6


Between 0604-0605 hours. The Bismarck with her guns trained to port opens fire on the Prince of Wales.
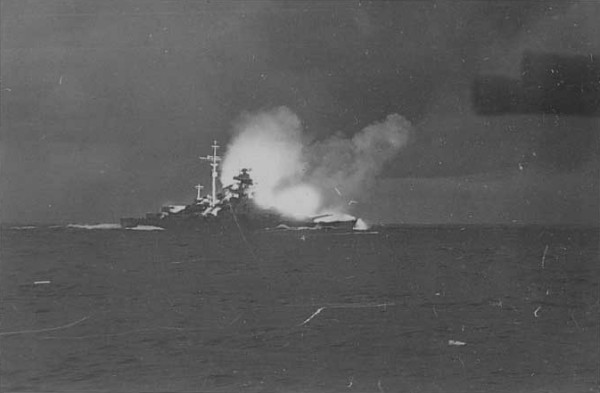
This is the most well known photo of the battleship Bismarck and one the most famous of World War II as well.
It was taken from the Prinz Eugen sometime between 0607 and 0609 hours.
By then the Hood had already been sunk and the Bismarck hit by three 14-inch shells.
The after turrets "Cäsar" and "Dora" are firing against the Prince of Wales in one of the last salvoes of the battle.
Don't be misled, it's daylight but the flash of the guns led to the darkened underexposure of the photo.
The Prinz Eugen was not hit during the battle and remained undamaged, even though some Hood's shells landed close by in the opening phase of the engagement and fragments landed on board. However, the Bismarck had been hit on the port side by three 14-inch shells. The Prince of Wales had in fact achieved three straddles with three hits out of a total of 18 salvoes. The first shell hit Bismarck amidships below the waterline in section XIV, passed through the outer hull just below the main belt, and exploded against the 45-mm armoured torpedo bulkhead. This hit caused the flooding of the port electric plant No. 4. The adjacent No. 2 boiler room also took some water, but this was contained by the damage control parties through the use of hammocks. The second shell hit the bow in section XX-XXI, just above the waterline. This projectile entered the port side, passed through the ship above the 20-mm upper platform deck without exploding, and exited the starboard side leaving a hole of 1.5 metres in diameter. Around 1,000 tons of salt water got into the forecastle, and as a consequence of this several hundred tons of fuel oil were blocked down in the lower tanks. The third shell simply passed through a boat amidships without any appreciable damage at all.
As a result of these hits, the top speed of the Bismarck was reduced to 28 knots. The battleship was 3ş down by the bow and had a 9ş list to port. Because of this, the ship motions caused the blades of the starboard propeller to emerge from the water at times. Therefore the starboard void tanks in sections II and III were flooded to reduce the bow trim and list. The damage was not particularly serious, the Bismarck maintained intact her fighting capability, good speed, and there were no casualties among the crew; only five men had been slightly wounded. However, the loss of fuel was to affect the remaining course of action.
Footnotes:
1. Korvettenkapitän Paulus Jasper choice proved to be correct in the end, since 20.3 cm armour piercing shells (Psrg. L/4,4) would not have been effective against heavily armoured ships such as Hood and Prince of Wales. 20.3 cm high explosive shells (Spgr. L/4,7) were much more adequate to destroy un-armoured superstructures and other light equipment on decks.
2. Maybe Lütjens was still trying to avoid the combat with the British ships, following orders from the High Command. Müllenheim-Rechberg, in his book, "Battleship Bismarck, A Survivor's Story, says that he heard Captain Lindemann say: "I just won't let my ship be shot out from under my ass...... Permission to fire!"
3. It has been sometimes suggested in naval circles that it was the Prinz Eugen the ship that actually scored the fatal hit on the Hood. However, the Prinz Eugen could not have been responsible for this hit because at the time the decisive hit occurred (0600 hours) the German cruiser was firing at Prince of Wales. PG had shifted fire to POW at about 0557 just after hitting Hood in the shelter deck. Moreover, although Hood’s deficiencies in terms of protection are well known, it is theoretically impossible for a 20.3 cm projectile to penetrate Hood’s armour and reach her magazines. Also keep in mind that PG was firing HE shells instead of APs. Prinz Eugen’s shells were considerably smaller than those of Bismarck, weighting only 122 kg.
- Psgr. L/4,4 (m.Hb), AP base fused, weight 122 kg, explosive charge 2.30 kg.
- Spgr. L/4,7 Bdz (m.Hb), HE base fused, weight 122 kg, explosive charge 6.54 kg.
- Spgr. L/4,7 Kz, HE nose fused, weight 122 kg, explosive charge 8.93 kg.
4. The three survivors from the Hood were Midshipman William J. Dundas, Able Seaman Robert E. Tilburn, and Signalman Edward Briggs.
5. The Prince of Wales had 13 fatal casualties that would become 14 by the following day: Leading Signalman Walter Graham Andrews, Ordinary Seaman Harold Barlow, Able Seaman Leslie Maddocks Deeds, Ordinary Seaman Edward Patrick Diamond, Midshipman Peter Tuthill Dreyer, Ordinary Seaman William John Fairbairn, Able Seaman Harry Hallam, Able Seaman Arthur Molyneaux Harper, Leading Signalman Edward James Hunt, Midshipman John Bret Ince, Signal Boy Norman Johnstone, Able Seaman Thomas Ronald Slater, Ordinary Seaman Thornton Smith, and Leading Seaman Mervyn Richard Tucker who died on 25 May 1941.
6. It seems that there was a difference in opinion between Admiral Lütjens and Captain Lindemann. The latter wanted to follow the damaged Prince of Wales and destroy it.

Copyright © 1998-2024 KBismarck.com